Sunday, October 13, 2013

Easy DIY Halloween Crafts

Halloween is almost here!  I love scoping out clearance sections for deals on seasonal decor.  My favorites are Target, Williams-Sonoma, Bath & Body Works and Kohl's - unfortunately, it can be hit or miss at times.  Sometimes, stores will have great looking decor at winning prices, and other times, they seem to market cheaply made or too-trendy items that aren't even worth purchasing at 90% off.  An easy way to add items to your seasonal collection is to make your own.

Easy DIY Halloween Crafts #Decorations #Ideas #Cheap #Projects #Tutorials #Tutorial #Less #Indoor #Countdown #Days #Until #Fangs #Fanged #Vampire #Plastic #Teeth #Chalkboard #Paint #Glitter #Glittered #Glittery #Candle #Holders #Mini #Baby #Pumpkin #Pumpkins #Spiders #Spider #Fridge #Refrigerator #Magnet #Magnets #Ring #Rings

I found Kathleen's tutorial, wherein she used styrofoam pumpkins, a hole saw, glue and glitter to create shimmery, pumpkin candle holders.  Hello?!  Candles?  GLITTER?  Sign me up.  I got lucky, and found these silver, glittered craft pumpkins, so all they needed was a little saw action.  BOOM! Done.

Easy DIY Halloween Crafts #Decorations #Ideas #Cheap #Projects #Tutorials #Tutorial #Less #Indoor #Countdown #Days #Until #Fangs #Fanged #Vampire #Plastic #Teeth #Chalkboard #Paint #Glitter #Glittery #Glittered #Silver #Silvery #Shimmery #Shimmered #Candle #Holders #Pumpkin #Pumpkins #Spiders #Spider #Fridge #Refrigerator #Magnet #Magnets #Ring #Rings

For an easy, Halloween countdown, I purchased a large, foam pumpkin and covered it in chalkboard spray.  We update it daily, with a liquid chalk pen.

Easy DIY Halloween Crafts #Decorations #Ideas #Cheap #Projects #Tutorials #Tutorial #Less #Indoor #Countdown #Days #Until #Fangs #Fanged #Vampire #Plastic #Teeth #Chalkboard #Paint #Glitter #Candle #Holders #Pumpkin #Pumpkins #Spiders #Spider #Fridge #Refrigerator #Magnet #Magnets #Ring #Rings

Have you seen these vampire pumpkins, that Martha's team created?  Here's my version - minus the map tacks, and with foam pumpkins instead of the real deal.  

Easy DIY Halloween Crafts #Decorations #Ideas #Cheap #Projects #Tutorials #Tutorial #Less #Indoor #Countdown #Days #Until #Fangs #Fanged #Vampire #Plastic #Teeth #Chalkboard #Paint #Glitter #Candle #Holders #Mini #Baby #Pumpkin #Pumpkins #Spiders #Spider #Fridge #Refrigerator #Magnet #Magnets #Ring #Rings

Allie had such a great idea, with these spider magnets - they were so cheap and simple to make.  I purchased a bag of spider rings, and clipped off the ring portion.  Then, I took a pack of magnets and cut them down, using hot glue to affix them to the back of the spiders.  You can arrange them any way you like!


Easy DIY Halloween Crafts #Decorations #Ideas #Cheap #Projects #Tutorials #Tutorial #Less #Indoor #Countdown #Days #Until #Fangs #Fanged #Vampire #Plastic #Teeth #Chalkboard #Paint #Glitter #Candle #Holders #Pumpkin #Pumpkins #Spiders #Spider #Fridge #Refrigerator #Magnet #Magnets #Ring #Rings


What crafts have you created for Halloween?


Follow me on Instagram 
My latest finds on Pinterest
"Like" Domestic Femme on Facebook

Don't miss out on future projects and recipes!  Subscribe by email, at the bottom of this page. 
 
Follow on Bloglovin

Monday, October 7, 2013

Lemon Bundt Cake with Citrus Glaze

Y'all, I made my first Bundt cake {and it turned out pretty well}!  It was surprisingly difficult to find a recipe with actual lemon in it.  I kept finding ones with lemon flavored soda, lemon flavored pudding, lemon flavored cake mix <-- GROSS
Then I found this one. 

Lemon Bundt Cake with Citrus Glaze {Domestic Femme} #Cakes #Recipe #Recipes #Ingredients #Lemons #Dessert #Desserts #Pound #Fresh #Real #Fluted #Brunch #Baby #Bridal #Wedding #Shower #Showers #Easy #Idea #Ideas #Baked #Breakfast #Holiday #Holidays #Food #Foods #Mothers #Fathers #New #Years #Brunch #Party #Parties #Menu #Menus #Christmas #Easter #Thanksgiving #Sunday #Crowd #Make #Ahead #Best #Summer #Seasonal #Spring

The glaze compliments the cake nicely and makes it SO moist.  When I baked this, I initially ate some, gave half to the neighbors, and then sent my husband to work with the rest {so as not to tempt myself}.  Now, I see that was a mistake, and am seriously considering making another one tonight.

Lemon Bundt Cake with Citrus Glaze {adapted from memyselfandi's recipe} Printable Recipe
makes: 1 cake


Ingredients (cake):

3 cups all-purpose flour
2 1/3 cups white sugar
1 1/2 teaspoons baking powder
2 teaspoons salt
2 teaspoons vanilla extract
1 tablespoon lemon zest {about 2 lemons}
1/2 cup lemon juice
1 cup vegetable oil
1 1/2 cups milk
3 eggs

Lemon Bundt Cake with Citrus Glaze {Domestic Femme} #Cakes #Recipe #Recipes #Ingredients #Lemons #Dessert #Desserts #Pound #Fresh #Real #Fluted #Brunch #Baby #Bridal #Wedding #Shower #Showers #Easy #Idea #Ideas #Baked #Breakfast #Holiday #Holidays #Food #Foods #Mothers #Fathers #New #Years #Brunch #Party #Parties #Menu #Menus #Christmas #Easter #Thanksgiving #Sunday #Crowd #Make #Ahead #Best #Summer #Seasonal #Spring


Directions (cake):

1) Preheat the oven to 325 degrees.

2) In a food processor, blend together the vanilla, lemon juice, zest, and oil; mix together for about a minute. <-- I do this, because I can't stand chewing on bits of lemon zest, and want them broken down so I just get the delicious flavor.  If you enjoy the zest in all of its glory, skip this step.

3) In a mixing bowl, sift together the flour, sugar, baking powder and salt.  Slowly mix in the milk and eggs.  Then, pour in the vanilla, juice, zest and oil.

4) Pour into a fluted pan {i.e. Bundt}.  Bake in the preheated oven for 70-75 minutes, or until a toothpick inserted into the center of the cake comes out clean.  Allow the cake to cool for 10 minutes, and then run a paring knife along the sides of the cake, to loosen it.  Cover the cake pan with a plate and flip the cake out onto it.

In the 10 minutes that you allow your cake to cool, you can whip up the glaze!

Ingredients (glaze):

1 tablespoon lemon zest {about 2 lemons}
1/4 teaspoon vanilla extract
1/2 lemon - juiced
2 tablespoons milk
1/4 cup orange juice
1/4 cup white sugar
1 1/3 cup powdered sugar


Directions (glaze):

1) In a food processor, blend together the zest, vanilla, lemon juice, milk, orange juice, and sugars; mix together for about a minute. <-- Again, I do this because I can't stand chewing on bits of lemon zest, and want them broken down so I just get the delicious flavor.  If you enjoy the zest in all of its glory, skip this step.

2) In a small saucepan over medium heat, stir together the zest, vanilla, lemon juice, milk, orange juice, and sugars.  Whisk until it comes to a foamy boil, cooking for about a minute more, and then remove from heat.  Drizzle mixture over warm cake and enjoy!


Lemon Bundt Cake with Citrus Glaze {Domestic Femme} #Cakes #Recipe #Recipes #Ingredients #Lemons #Dessert #Desserts #Pound #Fresh #Real #Fluted #Brunch #Baby #Bridal #Wedding #Shower #Showers #Easy #Idea #Ideas #Baked #Breakfast #Holiday #Holidays #Food #Foods #Mothers #Fathers #New #Years #Brunch #Party #Parties #Menu #Menus #Christmas #Easter #Thanksgiving #Sunday #Crowd #Make #Ahead #Best #Summer #Seasonal #Spring


Have you made a Bundt cake before?  What's your favorite?


Follow me on Instagram 
My latest finds on Pinterest
"Like" Domestic Femme on Facebook

Don't miss out on future projects and recipes!  Subscribe by email, at the bottom of this page. 
 
Follow on Bloglovin

Friday, October 4, 2013

Buffalo Chicken Dip

If you're looking for a Game Day appetizer, this is the mother of all meaty dips.  The added chicken essentially turns it into a meal, so don't feel bad about eating too much.  The creamy cheese and satiating chicken are polished off with a spicy bite, making this one addictive football game snack.
Buffalo Chicken Dip {Domestic Femme} #Ranch #Easy #Dips #Football #Game #Day #Days #GameDay #GameDays #Appetizer #Appetizers #Snack #Snacks #Cream #Cheese #Sauce #Franks #Super #Bowl #SuperBowl #Recipe #Recipes #Finger #Foods #Food #Celery #Crowd #Party #Parties #Potluck #Potlucks

My husband recently purchased a bigger mixer for me.  I'd drooled over this KitchenAid for months, and lemme tell you - I'm totally in love with it.  When the holidays roll around and you find yourself making multiple batches of cookies and pie crusts, it saves time and aggravation to be able to make all of them at the same time.

Buffalo Chicken Dip {adapted from Nunpunch's recipe} Printable Recipe
makes: 1 - 8x8 dish

Ingredients:


2 lbs. Chicken, cooked in garlic powder and a little oil
1 cup Ranch dressing {I highly recommend using Hidden Valley}
3/4 cup Cheddar Cheese, shredded
2 (8oz.) packages, Cream Cheese
2/3 (23 oz.) bottle Frank's Buffalo Sauce {update: we've discovered Hooter's wing sauce at our grocery store, and it's now our favorite - just empty the entire jar into your batch}


Directions:

1) Preheat oven to 350 degrees.
2) In a mixer, blend together the chicken and cream cheese until the chicken is shredded.
3) Add in the dressing and sauce, mixing until well blended.
4) Pour into your 2qt. baking dish and top with cheese.
5) Bake for 20 minutes, until cheese is melted.

You can eat this with chips, but I prefer to scoop it with celery sticks - either way, it's out of this world.

What favorite appetizer do you enjoy, during games?


Follow me on Instagram 
My latest finds on Pinterest
"Like" Domestic Femme on Facebook

Don't miss out on future projects and recipes!  Subscribe by email, at the bottom of this page. 
 
Follow on Bloglovin

Friday, September 27, 2013

Jalapeno Cilantro Ranch Dip

This zesty, creamy dip | sauce | dressing is so versatile.  We dip our tortilla chips and vegetables in it, and I've even poured it over my fajita salad and various BBQ meats.  If you love Chuy's Creamy Jalapeño Sauce, you will LOVE this! 

Jalapeno Cilantro Ranch Dip #Dips #Dressing #Recipe #Recipes #Appetizer #Appetizers #Chuys #Creamy #Sauce #GameDay #Game #Day #Days #Easy #Snack #Snacks #Football #Super #Bowl #Superbowl #Finger #Food #Foods #Crowd #Party #Parties #Potluck #Potlucks #Sour #Cream

Jalapeno Cilantro Ranch Dip Printable Recipe
makes: 2 cups

Ingredients:

1/2 bunch cilantro
1 (1oz.) packet Hidden Valley Ranch dressing
1 (15.5oz.) jar La Costeña "Nachos" Jalapenos {DO NOT use any other brand}
1 (16oz) container Sour Cream 

Directions:

1) Pull off the cilantro leaves as best you can, and discard the stems.
2) In a food processor or blender (LOVE my Ninja!), pour in the ranch, cilantro, sour cream and the entire jar of jalapenos {along with its juice}.
3) Mix together with the blender for about a minute, until well blended.

Jalapeno Cilantro Ranch Dip #Dips #Dressing #Recipe #Recipes #Appetizer #Appetizers #Chuys #Creamy #Sauce #GameDay #Game #Day #Days #Easy #Snack #Snacks #Football #Super #Bowl #Superbowl #Finger #Food #Foods #Crowd #Party #Parties #Potluck #Potlucks #Sour #Cream

This is a quick, easy appetizer to throw together for game days.

What's your favorite dip?


Follow me on Instagram 
My latest finds on Pinterest
"Like" Domestic Femme on Facebook

Don't miss out on future projects and recipes!  Subscribe by email, at the bottom of this page. 
 
Follow on Bloglovin

Sunday, September 22, 2013

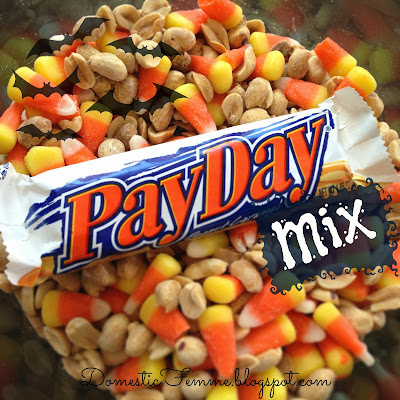
Favorite Fall Snacks: PayDay Mix

Today, I turned a Candy Corn hater {my husband} into a fan.  This is such an effortless and addicting treat, and it tastes just like a peanut butter & caramel PayDay.  
Think of it as your Fall Trail Mix!

 Favorite Fall Snacks: PayDay Mix #Peanuts #Caramel #Pay #Day #Snack #Idea #Ideas #Kid #Friendly #Quick #Easy #Candy #Bar #Bars #TrailMix #Trail #Mix #Halloween


PayDay Mix (courtesy of my mom) Printable Recipe 
makes: 3lbs.

Ingredients:

1lb. package Candy Corn
2lbs. salted peanuts

Favorite Fall Snacks: PayDay Mix #Peanuts #Caramel #Pay #Day #Snack #Idea #Ideas #Kid #Friendly #Quick #Easy #Candy #Bar #Bars #TrailMix #Trail #Mix #Halloween

Directions:

1) Mix together the peanuts and candy corn.  Enjoy!  I store my stash in one of these glass, gallon jars.

What are some of your favorite Fall treats?

Follow me on Instagram 
My latest finds on Pinterest
"Like" Domestic Femme on Facebook

Don't miss out on future projects and recipes!  Subscribe by email, at the bottom of this page. 
Follow on Bloglovin

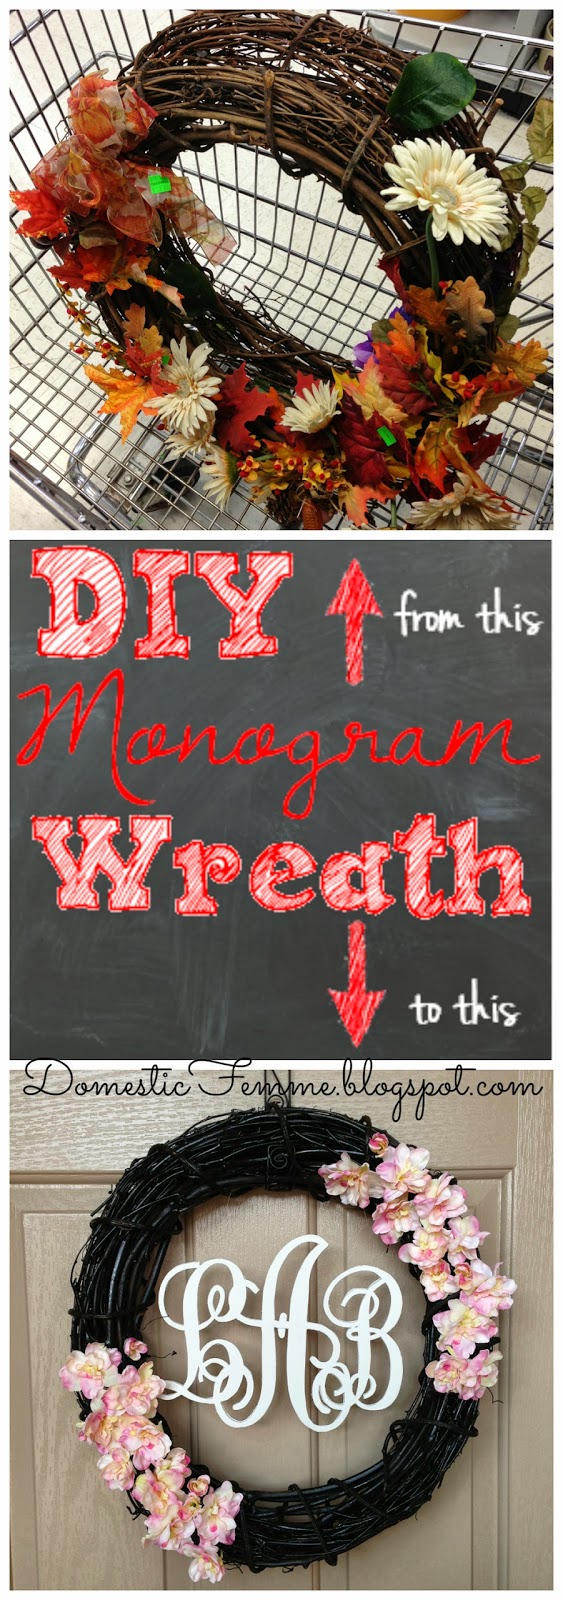
Thrift Store Finds: From Fugly $3 Wreath to A DIY Monogram Front Door Showpiece

DIY Foam Monogram Wreath For Less {Domestic Femme} #Wreaths #StepByStep #Tutorial #Tutorials #How #To #Fall #Spring #Summer #Winter #Instructions #Letters #Letter #How #To #Decor #Decorating #Decorations #Front #Porch #Wedding #Shower #Idea #Ideas #Monogrammed #Monograms #Microsoft #Word

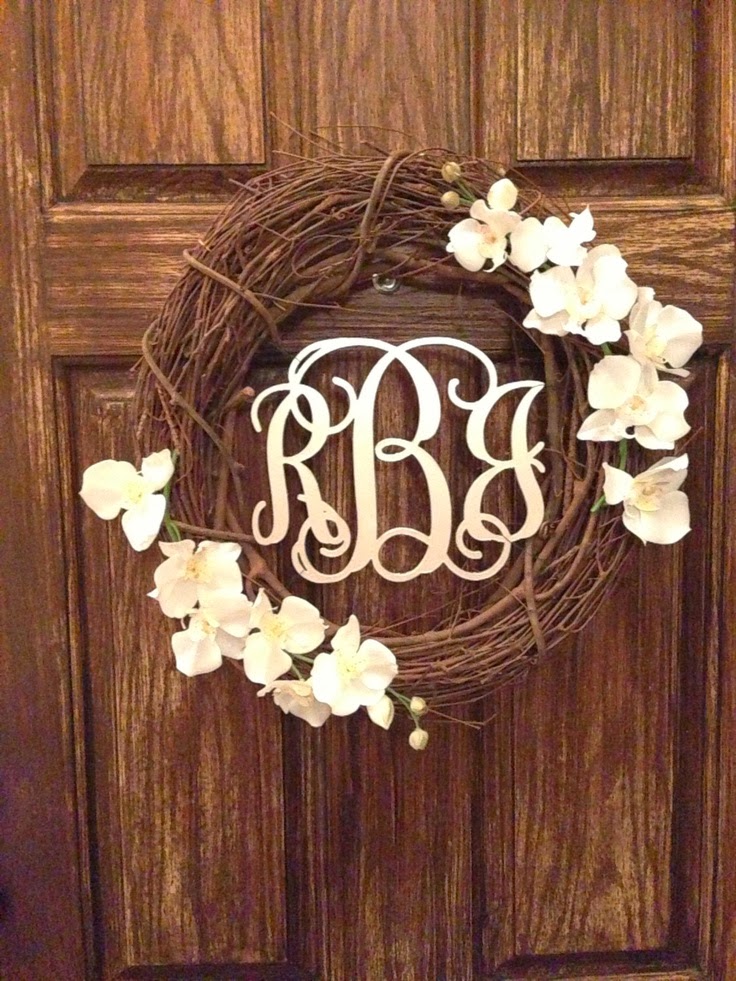
Last weekend, I had the pleasure of co-hosting a Wedding Shower with my sister, for our soon-to-be sister in-law.  I found a ton of great ideas on Pinterest - several made their way into the festivities.  One of the things I stumbled upon was this wreath:

source: Becca Wong of EternalWreaths

for $70

Seventy dollars for door decor was not within our budget.  Even if it was, spending that much on a wreath just doesn't sit well with me.  I found Diane's tutorial on creating a monogram wreath from foam board and went for it.  Her tutorial gave the option of using Photoshop or Microsoft Publisher - neither of which I had, so I used Microsoft Word instead, and created a walk-through for you all.

What you'll need:

Monogram Printout {design tutorial here}
Foam Board
Transfer Paper
Hot Knife {I use this one}
Hot Glue
Wreath
Spray Paint - glossy black
Flowers of Choice

I found this wreath at Goodwill for $3, took it home, and plucked off all of the not-so-cute flowers.  Next, I covered it with $1 glossy, black spray paint.

DIY Foam Monogram Wreath For Less {Domestic Femme} #Wreaths #StepByStep #Tutorial #Tutorials #How #To #Fall #Spring #Summer #Winter #Instructions #Letters #Letter #How #To #Decor #Decorating #Decorations #Front #Porch #Wedding #Shower #Idea #Ideas #Monogrammed #Monograms #Microsoft #Word

While it dried, I took my Monogram printout and laid a piece of transfer paper over top.  I traced the monogram onto the paper, and then taped the transfer paper to the white foam board.  Using the hot knife, I carefully cut out the monogram.

DIY Foam Monogram Wreath For Less {Domestic Femme} #Wreaths #StepByStep #Tutorial #Tutorials #How #To #Fall #Spring #Summer #Winter #Instructions #Letters #Letter #How #To #Decor #Decorating #Decorations #Front #Porch #Wedding #Shower #Idea #Ideas #Monogrammed #Monograms #Microsoft #Word

Fishing line was used to carefully hang the monogram from the wreath.  We purchased two $6 sprigs of Delphinium from Joann Fabrics, pulled off the buds and hot glued them onto the wreath.


DIY Foam Monogram Wreath For Less {Domestic Femme} #Wreaths #StepByStep #Tutorial #Tutorials #How #To #Fall #Spring #Summer #Winter #Instructions #Letters #Letter #How #To #Decor #Decorating #Decorations #Front #Porch #Wedding #Shower #Idea #Ideas #Monogrammed #Monograms #Microsoft #Word

Not bad for less than twenty bucks, huh?

What favorites have you saved from thrift stores?


Follow me on Instagram 
My latest finds on Pinterest
"Like" Domestic Femme on Facebook
Don't miss out on future projects and recipes!  Subscribe by email, at the bottom of this page. 
Follow on Bloglovin

DIY Monogram Wreath Prep Work: Designing Your Foam Monogram for Less

How To Make a Foam Monogram {Domestic Femme} #Wreath #Wreaths #Foam #StepByStep #Tutorial #Tutorials #How #To #Fall #Spring #Summer #Winter #Monogrammed #Monograms #Microsoft #Word #Idea #Ideas


You're at the right place, if you read this tutorial for making a Monogram Wreath, and need help making your actual printout.
Download the Monogram KK font here.  Open Microsoft Office Word, click on the "Page Layout" tab, and select "Landscape" from the "Orientation" button.

How To Make a Foam Monogram {Domestic Femme} #Wreaths #Foam #StepByStep #Tutorial #Tutorials #How #To #Fall #Spring #Summer #Winter

Under the same "Page Layout" tab, select "Narrow" from the "Margins" button.

How To Make a Foam Monogram {Domestic Femme} #Wreaths #Foam #StepByStep #Tutorial #Tutorials #How #To #Fall #Spring #Summer #Winter

Go to the "Home" tab, select "Monogram kk sc" from the drop-down box, change the font size to 365, click the "B" below, to bold your font, and center the paragraph {the one highlighted above the word "Paragraph"}.

How To Make a Foam Monogram {Domestic Femme} #Wreath #Wreaths #Foam #StepByStep #Tutorial #Tutorials #How #To #Fall #Spring #Summer #Winter #Monogrammed

Type out the initials you want, and take a screenshot {I use Jing} of each individual letter, saving the three files to your computer - leave MS Word open for later.  Go to Pixlr, a free website {no sign up necessary}.
Select "Pixlr Editor" and then "Open image from computer".

How To Make a Foam Monogram {Domestic Femme} #Wreaths #Foam #StepByStep #Tutorial #Tutorials #How #To #Fall #Spring #Summer #Winter

Locate the first letter that you saved, highlight it and click "Open".

How To Make a Foam Monogram {Domestic Femme} #Wreaths #Foam #StepByStep #Tutorial #Tutorials #How #To #Fall #Spring #Summer #Winter

With the first image open, click "Layer", and then "New Layer".

How To Make a Foam Monogram {Domestic Femme} #Wreaths #Foam #StepByStep #Tutorial #Tutorials #How #To #Fall #Spring #Summer #Winter

Double click the padlock icon, until it changes to a check mark.

How To Make a Foam Monogram {Domestic Femme} #Wreaths #Foam #StepByStep #Tutorial #Tutorials #How #To #Fall #Spring #Summer #Winter

Drag "Layer 0" until it's above "Layer 1"


Select the wand tool.

How To Make a Foam Monogram {Domestic Femme} #Wreaths #Foam #StepByStep #Tutorial #Tutorials #How #To #Fall #Spring #Summer #Winter

Click your wand within a white space, so you see a moving, dotted outline around it.

How To Make a Foam Monogram {Domestic Femme} #Wreaths #Foam #StepByStep #Tutorial #Tutorials #How #To #Fall #Spring #Summer #Winter

Hold down the Ctrl button on your keyboard and then tap the letter "X", to cut the selected area.  Notice the gray & white checkerboard?

How To Make a Foam Monogram {Domestic Femme} #Wreaths #Foam #StepByStep #Tutorial #Tutorials #How #To #Fall #Spring #Summer #Winter

Repeat this process, until all of the white space is removed.

How To Make a Foam Monogram {Domestic Femme} #Wreaths #Foam #StepByStep #Tutorial #Tutorials #How #To #Fall #Spring #Summer #Winter

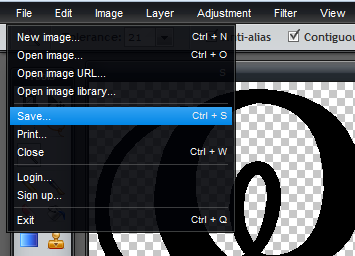
Go to "File" and select "Save".

How To Make a Foam Monogram {Domestic Femme} #Wreaths #Foam #StepByStep #Tutorial #Tutorials #How #To #Fall #Spring #Summer #Winter

Keep the original name as before, and ensure the format is set to "PNG".  Click "OK".

How To Make a Foam Monogram {Domestic Femme} #Wreaths #Foam #StepByStep #Tutorial #Tutorials #How #To #Fall #Spring #Summer #Winter

Click "Yes", when it states that the file already exists and asks if you want to replace it.

How To Make a Foam Monogram {Domestic Femme} #Wreaths #Foam #StepByStep #Tutorial #Tutorials #How #To #Fall #Spring #Summer #Winter

Close out the first letter's window, by clicking the X.  When it asks you if you want to save the image before closing, click "No".

How To Make a Foam Monogram {Domestic Femme} #Wreaths #Foam #StepByStep #Tutorial #Tutorials #How #To #Fall #Spring #Summer #Winter

This window will pop up again.  Select "Open image from computer", follow the same steps again for the two remaining letters, removing the white parts, and then save them.

How To Make a Foam Monogram {Domestic Femme} #Wreaths #Foam #StepByStep #Tutorial #Tutorials #How #To #Fall #Spring #Summer #Winter

After saving the three individual letter files, go back into MS Word, and delete the letters you typed earlier.  Click the "Insert" tab and select the "Picture" option.

How To Make a Foam Monogram {Domestic Femme} #Wreaths #Foam #StepByStep #Tutorial #Tutorials #How #To #Fall #Spring #Summer #Winter

Check the box for each of the three files you saved earlier, and click "Insert".

How To Make a Foam Monogram {Domestic Femme} #Wreaths #Foam #StepByStep #Tutorial #Tutorials #How #To #Fall #Spring #Summer #Winter

Once you've added the three images, click on one to outline it.  While highlighted, under the "Format" tab, click "Text Wrapping" and then "Square".  Click on the remaining images and repeat.

How To Make a Foam Monogram {Domestic Femme} #Wreaths #Foam #StepByStep #Tutorial #Tutorials #How #To #Fall #Spring #Summer #Winter

Drag the letters around, until they're arranged in the right order.  Expand the size of each letter, and ensure the outside letters overlap the middle one.

How To Make a Foam Monogram {Domestic Femme} #Wreaths #Foam #StepByStep #Tutorial #Tutorials #How #To #Fall #Spring #Summer #Winter

Double check that your letters are proportional and as big as possible, without going past your print margins.

How To Make a Foam Monogram {Domestic Femme} #Wreaths #Foam #StepByStep #Tutorial #Tutorials #How #To #Fall #Spring #Summer #Winter

Print your masterpiece.  You're ready to go to the next step and continue with your wreath.


Follow me on Instagram 
My latest finds on Pinterest
"Like" Domestic Femme on Facebook
Don't miss out on future projects and recipes!  Subscribe by email, at the bottom of this page. 
 
Follow on Bloglovin
Related Posts Plugin for WordPress, Blogger...